AVIC F-Series Firmware Update Download
INSTRUCTIONS FOR DOWNLOADING FIRMWARE UPDATES FOR AVIC-F900BT/ AVIC-F90BT/ AVIC-F700BT
**After you download the firmware update files onto your computer, you will need to transfer the files to an SD card (512MB or larger) in order to install them on your navigation system.
Important
Please print or save these Instructions (Adobe Acrobat PDF, 219 KB) before downloading and installing the firmware updates -- it is very important that you complete all steps correctly and in the order described below. Failure to do so could cause data stored onto your navigation system to be permanently lost.
WARNING! These firmware updates are NOT applicable to the AVIC-F500BT/AVIC-LINC.
WARNING! These firmware updates apply only to models sold in Canada
If you have any difficulty carrying out these instructions, please contact the Pioneer Customer Service Center at 1-877-283-5901. Pioneer service representatives are available Monday through Friday, 9:00 a.m. to 5:30 p.m. (Eastern Time).
Before Downloading the Firmware Updates
Please check your system version number by doing the following to determine whether your system has already been updated with the new firmware updates:
- Press the "Menu" button
- Touch the "Settings" tab;
- Touch the “System Settings” tab;
- Touch the “Service Information” tab;
- The "Map version" number and the "Version" number are both displayed -- please look at the "Version" number, which is displayed on the lower line; and
- If the "Version" number is "1.001900" or an earlier/smaller number, please install the new firmware update. If the "Version" number is "2.000000" or a later/larger number, the system has already been updated with the new firmware.
- Write down the version number; you will need to refer to it again in step 9.
Downloading the Two Firmware Updates & Transferring them to an SD Card
Step 1
1-1. Download the system firmware update Zipfile onto your computer by clicking here. The location where you save the downloaded Zipfile should be accessible and easily remembered.
1-2. After you have downloaded the Zipfile, locate it on your computer and double click to decompress it.*
Once the Zipfile is decompressed, locate and open the folder named "F-Series Firmware Update".
Once the folder "F-Series Firmware Update" has been opened, locate within it the sub-folders named "LPUE080" and "TTS".
*If you do not have a decompression utility on your computer, you can download WinZip at http://www.winzip.com.
1-3. Transfer the "LPUE080" folder and "TTS" folder onto the top layer (folder) of your SD card. **
**You must use a SD card that is 512MB or larger and formatted with a FAT16 or FAT32 file system.
Step 2
2-1. Download the Bluetooth firmware update Zipfile onto your computer. There are two choices:
The location where you save the downloaded Zipfile should be accessible and easily remembered.
2-2. After you have downloaded the Zipfile, locate it on your computer and double click to decompress it.
Once the Zipfile is decompressed, locate and open the folder named "Bluetooth Update".
2-3. Transfer the 3 files in this folder onto the top layer (folder) of your SD card. Note: Only transfer the 3 files onto the SD card; do not transfer the folder containing the 3 files onto the SD card.**
** Use the same SD card that contains the system firmware update.
Installing the System Firmware Update on Your Navigation System
Step 3
Disconnect any iPod, iPhone, or USB device from the system before proceeding.
After you have transferred the "LPUE080" folder and "TTS" folder onto the top layer/folder of your SD card, insert the SD card into your AVIC-F900BT/ F90BT/ F700BT / F7010BT while your vehicle is turned OFF.
Next, turn ON your vehicle and navigation system. The system will automatically start the update process in one minute.
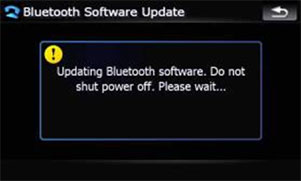
WARNING! While your navigation system is being updated with the new firmware, do NOT turn off the power to the navigation system. Severe damage to your navigation system could result from your failure to do so, including but not limited to the loss of all content/data that is stored on the internal Flash Memory of your system (such as address book entries, destination history, and other user information).
If your system does not automatically start the update process, please check your system and SD card as follows:
Check your system version again to confirm the necessity of this firmware update.
Check your SD card to confirm that the SD card contains the correct file in the correct format.
Step 4
Please wait for the firmware update to be installed - this should take approximately 10 minutes. The system will automatically reboot after the firmware update is completed.
Step 5
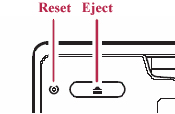
After your system has rebooted itself, press and hold down the system "reset" button (which is located just to the left of the "eject" button) for five (5) seconds and release it.
Next, determine which of the following applies:
- If the system boots ups and displays the main menu, go to Step 6.
- If the system does not display the main menu AND the screen is blacked out, press and hold the reset button and the eject button at the same time for five seconds and then release them. The system should reboot automatically and display the main menu. Now proceed to Step 6.
- If the system shows the "boot up screen" (see depiction below) BUT does not proceed to the main menu, press and hold down the "reset" button for five seconds and then release it. The system should reboot automatically and display the main menu. Now proceed to Step 6.
"Boot Up Screen"

Installing the Bluetooth Firmware Update on Your Navigation System
Step 6
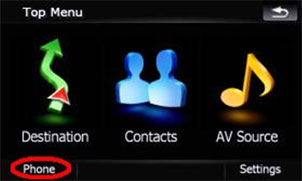
After your system has rebooted, press the “Menu” button and touch the “Phone” tab.
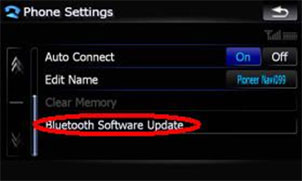
Then, touch the “Phone Settings” button, scroll down and touch the “Bluetooth Update” button.***
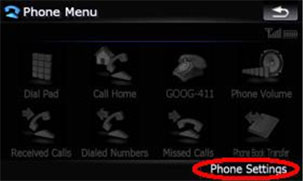
***Make sure that the "Bluetooth On/Off" setting is "ON" before proceeding to the next step.
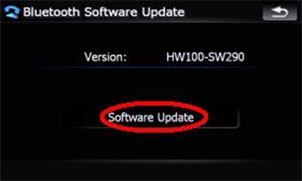
Step 7
Touch "Software Update" to update the Bluetooth firmware.
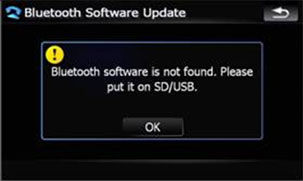
* If you see a message "Bluetooth software is not found." (shown below), press "OK" and remove the SD card. Then pause 10 seconds, re-insert the SD card, and touch "Software Update" again.
Step 8
After performing the Bluetooth firmware update, turn off your vehicle and turn on again, and wait for your system to boot up.
Installing the TTS Update (If Required)
Updating the TTS files is only required if you have firmware version number 1.000900 or earlier. Refer to the firmware version you previously wrote down; If your original firmware version was 1.001700 or 1.001900, proceed to Step 12.
Step 9
If your original firmware version number was 1.000900 or earlier, please continue. After your system has rebooted, press the "Menu" button and touch the "Setting" tab.
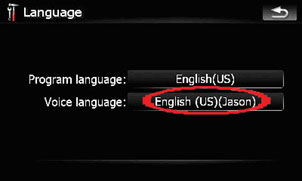
Then, touch the "System Setting" button and touch the "Language" button.
Step 10
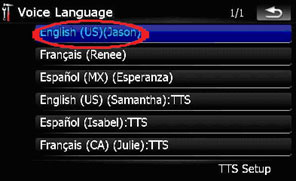
10-1. Touch the button to the right of "Voice Language" and then choose "English (US) (Jason)" from the list.
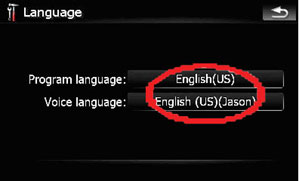
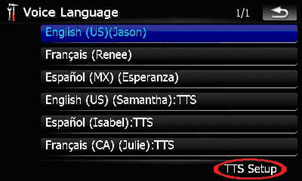
10-2. Touch the button to the right of "Voice language" (which shows "English (US) (Jason)") again.
10-3. Touch the "TTS Setup" tab on the right bottom of the screen.
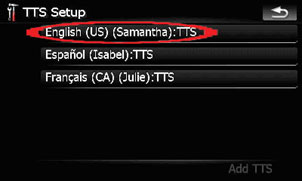
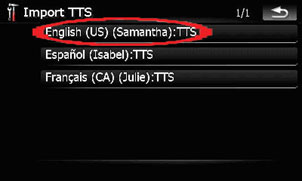
10-4. To update English TTS file, touch the "English (US) (Samantha):TTS" button.
10-5. Touch the "from SD" button.
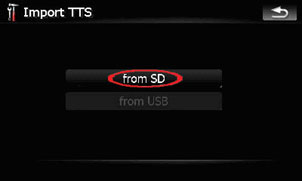
If you cannot select "from SD", please check your system and SD card as follows:
Check your SD card to confirm that the SD card contains the correct folder and files in the correct format.
10-6. Touch the "English (US) (Samantha):TTS" tab. Then English TTS file will be updated immediately.
WARNING!While your navigation system is being updated with the new firmware, do NOT turn off the power to the navigation system. Severe damage to your navigation system could result from your failure to do so, including but not limited to the loss of all content/data that is stored on the internal Flash Memory of your system (such as address book entries, destination history, and other user information).
If you cannot select "English (US) (Samantha):TTS", please check your system and SD card as follows:
Check your SD card to confirm that the SD card contains the correct folder and files in the correct format.
10-7. Repeat steps from 8-4 to 8-6 to update the Spanish and French TTS files. Select the "Espanol (Isabel):TTS" button to update the Spanish TTS files, and select the "Francais (CA) (Julie):TTS" button to update the French TTS files.
After your system has rebooted, press the "Menu" button and touch the "Setting" tab.
Then, touch the "System Setting" button and push the "Language" button.
Step 11
After updating all TTS files, turn off your vehicle and turn on again, and wait for your system to boot up.
Confirming that the Firmware Update was Successfully Installed
Step 12
Please follow the steps below to confirm the update process was successful:
12-1. Confirm your System Firmware Version
--Press the "Menu" button
--Select the "Settings" tab
--Select "System Settings"
--Select "Service Information"
--Confirm that your system correctly displays the following information:
Version: 2.000000
12-2. Confirm your Bluetooth Software Version
--Press the "Menu" button
--Select the "Phone" tab
--Select "Phone Settings"
--Scroll down the menu and select "Bluetooth Software Update"
--Confirm that your system correctly displays the following information:
Version: HW100-SW330 RC3
Your navigation system is now ready for use.
Post-Update procedures
Step 13
13-1. Recover the AV setting
If an iPod is connected to the system, turn AV1 input to "iPod".
Press the "Menu" button and touch the "Settings" tab. Select "AV Settings", and touch the "AV1 Input" button until "iPod" is displayed.
13-2. Calibrate the Screen
Press the "Menu" button and touch the "Settings" tab. Select "System Settings", and touch the "Screen Calibration" button.
Proceed with the guidance shown on the display and tap the screen to align the calibration.
Questions
If you have any questions, please contact the Pioneer Customer Service Center at 1-877-283-5901. Pioneer service representatives are available Monday through Friday, 9:00 a.m. to 5:30 p.m. (Eastern Time).